 Posted on August 14, 2013
 by admin
  0
0 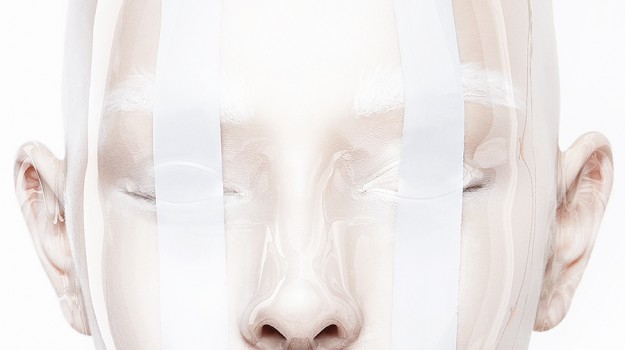
David Benoliel & Cristian Girotto created magic in the lab with there latest futuristic series for Zink
for those of you that keep asking me how was it done well here it is.
Apps Used: Adobe Photoshop
Apps Used: Cinema 4D
Estimated Completion Time: 3 Hours
Difficulty: Advanced
Apps Used: Adobe Photoshop
Apps Used: Cinema 4D
Estimated Completion Time: 3 Hours
Difficulty: Advanced
Final Product What You’ll Be Creating

In this tutorial, we will show you how to quickly and easily create a beautiful, futuristic portrait by applying a
plastic wrap effect or mask to a portrait using Cinema 4D and Photoshop. Let’s get started!
Tutorial Assets
______________________________________________________________________________
The following assets were used during the production of this tutorial. Please download them before you begin.
Editor’s note: Special thanks to Martin Higgs, Stefka Pavlova, and Shonagh Louise
for allowing us the use of their photo in this tutorial. The high resolution image is available on Shutterstock
but the low resolution image can be downloaded below for use in this tutorial.
- Mask (High Resolution)
- Mask (Low Resolution)
- Photo Studio
______________________________________________
1. Creating 3D Human Head
Step 1
Open Cinema 4D. Open Content Browser (Window > Content Browser) and go to Presets > Humans.
Double click on Lisa to add it on the stage.

Step 2
Remove the unwanted body parts. Select all nested layers below the body layer and press Delete.

Step 3
Press Enable Axis Modification from the left toolbar and select the blue dot at the bottom (Anchor point). Move the Anchor point of the body from the bottom to the center of the head by dragging.

Step 4
Rotation check. Don’t forget to disable Axis Modification. Press Rotate tool (Top toolbar) and rotate the figure just to check the Anchor point position. After the check Undo (CMD/CTRL + Z) Rotation.

Step 5
Press Polygon mode from left toolbar and select Rectangle Selection from the top toolbar. UncheckOnly Select Visible Elements. Draw a rectangle from legs to the neck with Rectangle Selection tool and press Delete.


Step 6
Switch the camera view to Perspective by pressing the square icon on the top-right corner of the window.

Try to adjust the position of the head using Move, Scale and Rotate icons on the top-right corner of the window. The position of the head must match the pose and perspective of the photo.

2. Adding Materials
Step 1
Create new material for the head (Create > New Material) from Material Manager panel.

Step 2
From Material Editor check Color and set:
- Color to black.

Step 3
From Material Editor check Reflection and set:
- Color to white.
- Brightness to 10%
- Max Strength to 35%

Step 4
From Material Editor check Reflection and set:
- Texture to Fresnel

Step 5
Add the new material to Lisa layer with dragging it from material manager. Select default material and pressDelete to remove it.

Step 6
Add Sky object (from top toolbar)

Step 7
Creating sky material. Open Photo_Studio.jpg in Adobe Photoshop. Make one copy of the Background layer (Layer > Duplicate layer).

Extend the visible area using the Crop tool.

Move upper layer to the right using Move tool. Save the image as Photo_Studio2.jpg

Step 8
Go back to Cinema 4D. Create new material for the sky. From Material Editor check Luminance and loadPhoto_Studio2.jpg as a Texture.

Drag the new material to the Sky layer.

Step 9
Press Render view (Top toolbar) for quick preview.

3. Render Settings
Step 1
Press Render settings (Top toolbar) to set:
Output settings:
- Width: 2000px
- Height: 1500px (Use the same height as Mask.jpg)
- Lock Ratio: checked
- Resolution: 300 DPI
- Frame Range: Current Frame

Step 2
Save settings:
- Format: PNG
- Alpha Channel: checked

Step 3
Anti-Aliasing settings:
- Anti-Aliasing: Best
- Min Level: 1×1
- Max Level: 4×4

Step 4
Press Render > Render to Picture Viewer to save the rendered image.

4. Placing the Mask Over the Face
Step 1
Go to Adobe Photoshop and open Mask.jpg (File > Open). Use Crop tool to crop only the face.

Step 2
Open Mask.png (File > Open) and place it over the face.

Step 3
Select the layer with the rendered mask and set the Blend mode to Screen.

Step 4
Go to Edit > Transform > Wrap (CMD/CTRL + T) and try to adjust the mask over the face. Try to match the jaw line, eyes and outline.

Step 5
Go to Filter > Liquify.
Set from liquify settings:
- Show Backdrop: checked
- Use: Background
- Mode: In Front
- Opacity: 43%

Step 6
Correct the position of the eyes, nose and mouth using Medium Brush Size. Keep Low Brush Density and Brush pressure.

Step 7
Correct the neck outline to fit the shape.

Step 8
Create new Adjustment layer > Levels

Step 9
Push-up the lights by moving the sliders to the left side. Create clipping mask by clicking click to clip the layer icon.

Step 10
Select the clipping mask and press CMD/CTRL + I to invert it. Select Round Soft Brush and white foreground color.

Step 11
Start to paint over the mask to reveal the lights over the mouth, cheeks etc.

Step 12
Create new Adjustment layer > Hue/Saturation.
Set:
- Saturation: -100
and create clipping mask.

Step 13
Select Layer 1 and add Layer mask.

Step 14
Select the mask of Layer 1. Use Round Soft Brush with Opacity: 20% and start to paint with black to hide some unwanted parts from the rendered mask.

Step 15
Use Color Picker to take a sample from the image background color.

Step 16
Make one New layer and start painting over the visible anoying hair and eyelashes.

Step 17
And finaly remove the large reflections of the nose.

Congratulations! You’re Done.
In this tutorial we managed to create a beautiful, futuristic portrait using Photoshop and Cinema 4D. You can experiment with different lights, environments and material settings in Cinema 4D. Try to experiment with this technique and apply what you learned from this tutorial to your own ideas.
Source: http://psd.tutsplus.com/tutorials/photo-effects-tutorials/plastic-mask-effect/
You must be logged in to post a comment.